
The Etublogs.USJ platform offers USJ teachers, students and institutions the possibility of creating websites thanks to the many online publishing features offered by the WORDPRESS software.
WORDPRESS is the world's most popular content management system. It is an open-source content management system developed for individuals without any coding experience who want to build websites and blogs. It allows you to quickly create user friendly sites.
If you wish to benefit from our support in this concern, do not hesitate to send us an email at the following address unte@usj.edu.lb or contact us at 01421000 ext. 5923 – 5924.
TO LOG IN
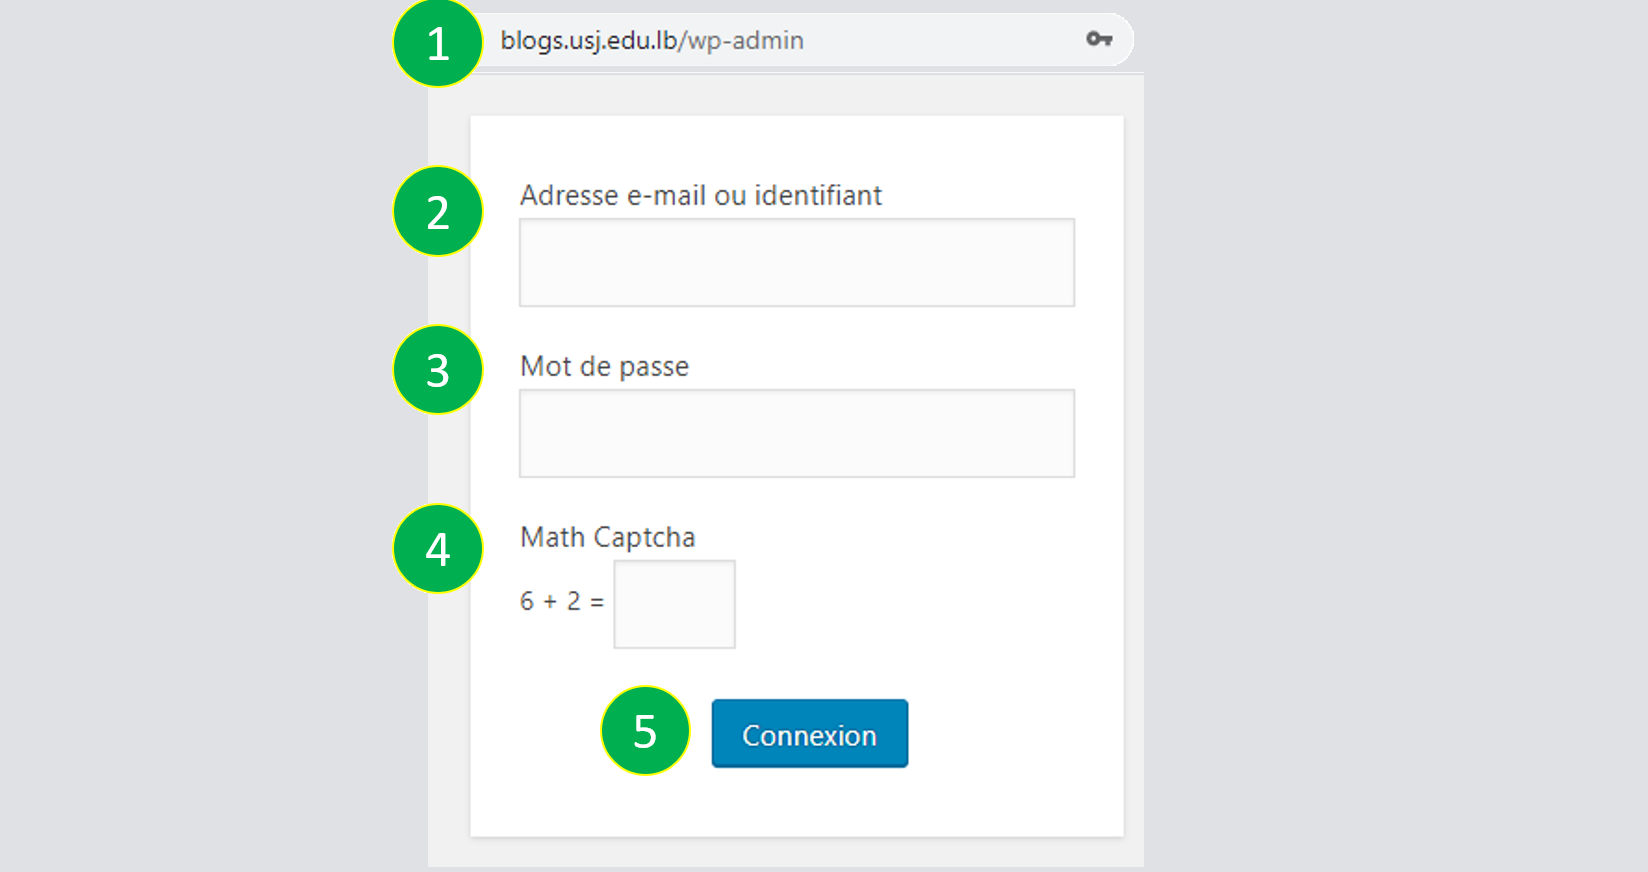
If you have been granted an access to USJ blog; you are required to do the following;
- Open a browser and navigate to http://blogs.usj.edu.lb/wp-admin/ (or alternatively http://etublogs.usj.edu.lb/wp-admin/)
- Enter your username
- Enter your password,
- Answer the Math Captcha
- Click on the “Connection” button.
CREATE CATEGORIES/KEYWORDS
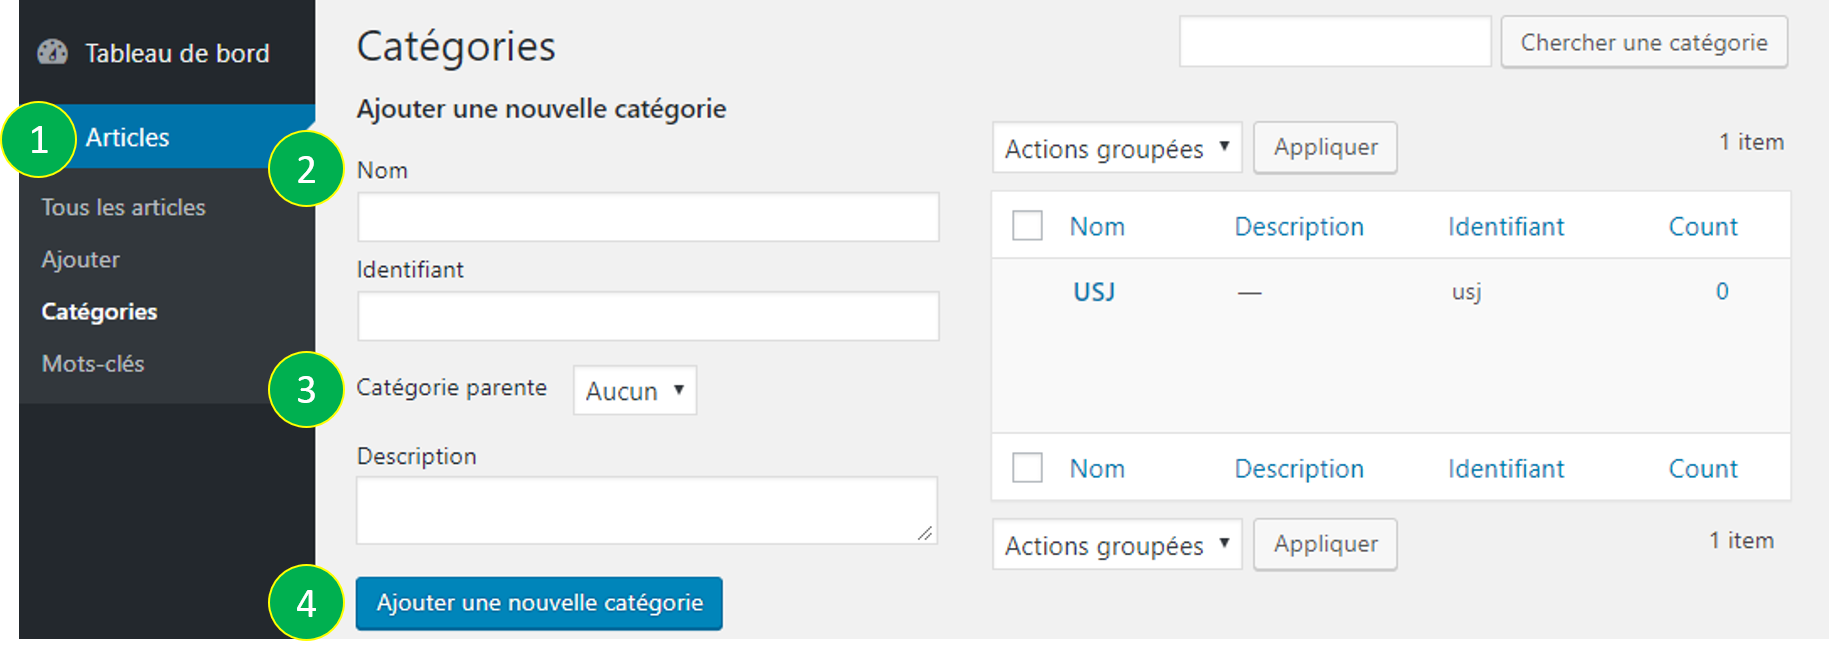
A. CREATE NEW CATEGORIES
- Click on « Posts» and then click on « Categories »
- Enter the name of the new category
- Choose the parent category (among old categories)
- Click on the “Add a new category” button.
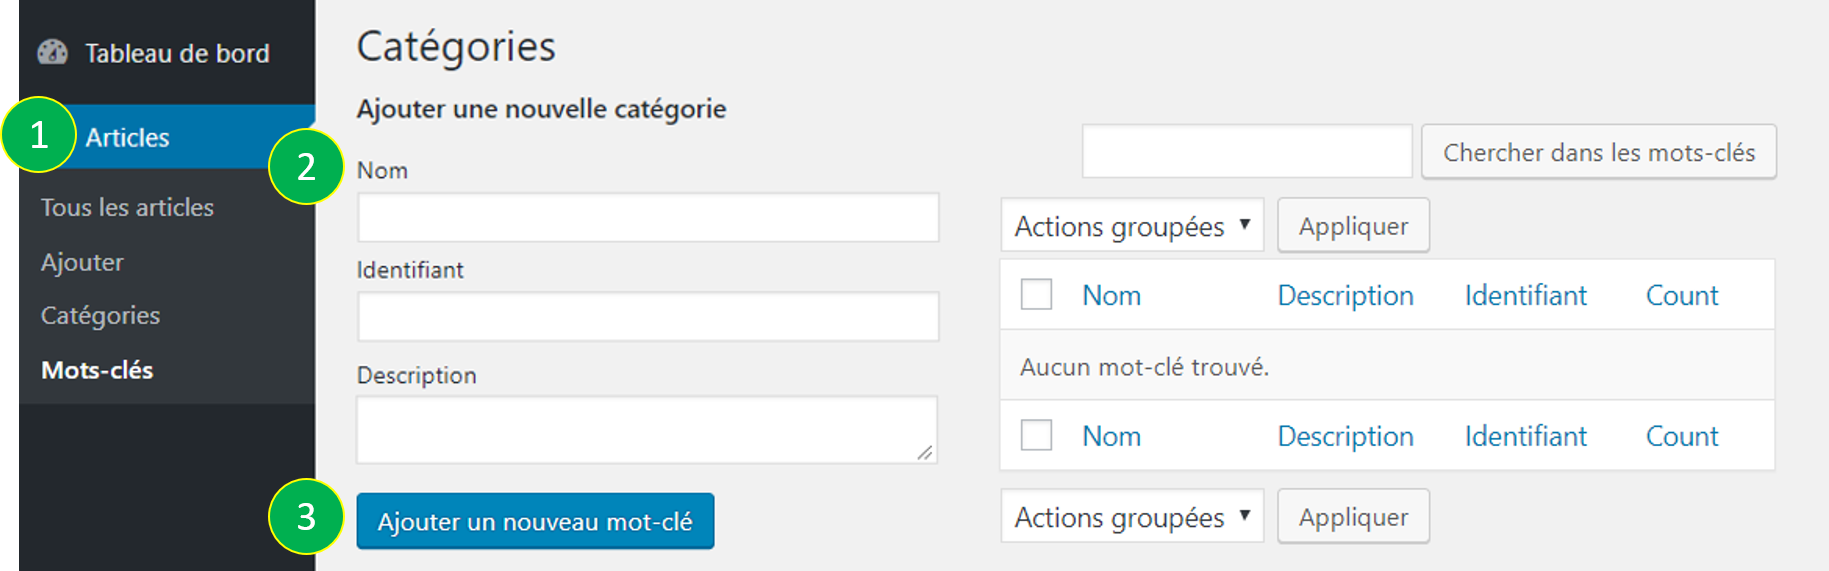
B. CREATE NEW KEYWORDS
- Click on « Posts» and then click on « Keywords »
- Enter the name of the new keyword
- Click the “Add New Keyword” button.
CREATE NEW POSTS
A. CREATING A NEW POST
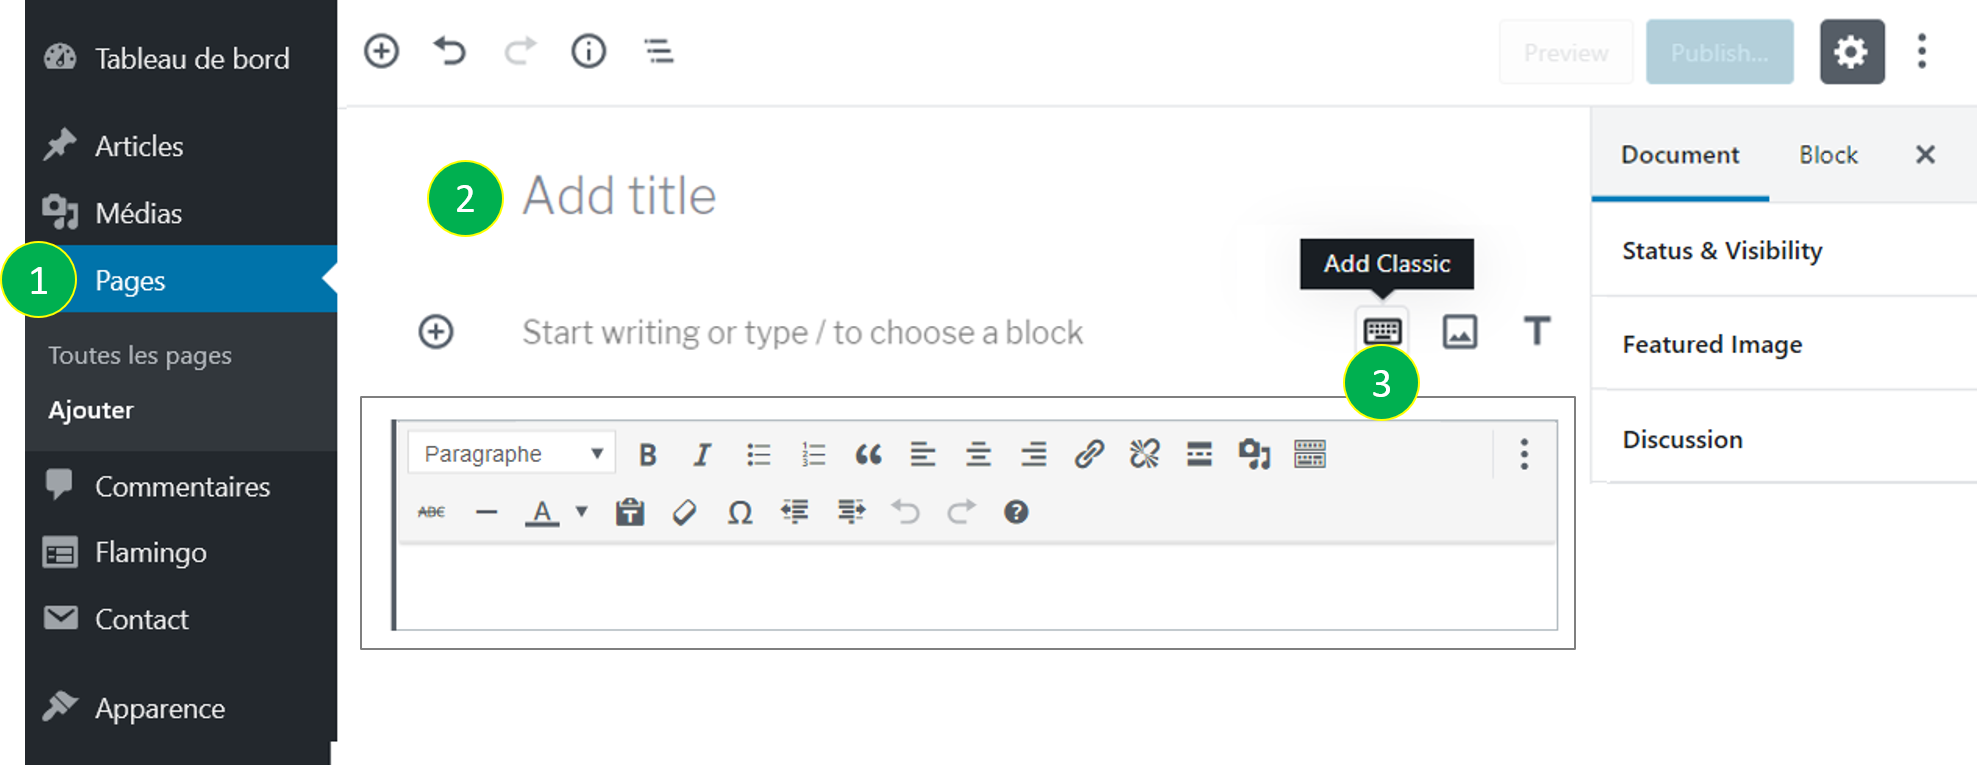
- Click on “Posts” and then click on “Add”.
- Enter the title of your new post.
- Click on the « ADD CLASSIC» option to add the standard block (containing several options made available by the WordPress editor *) which will allow you to write the text of your post.

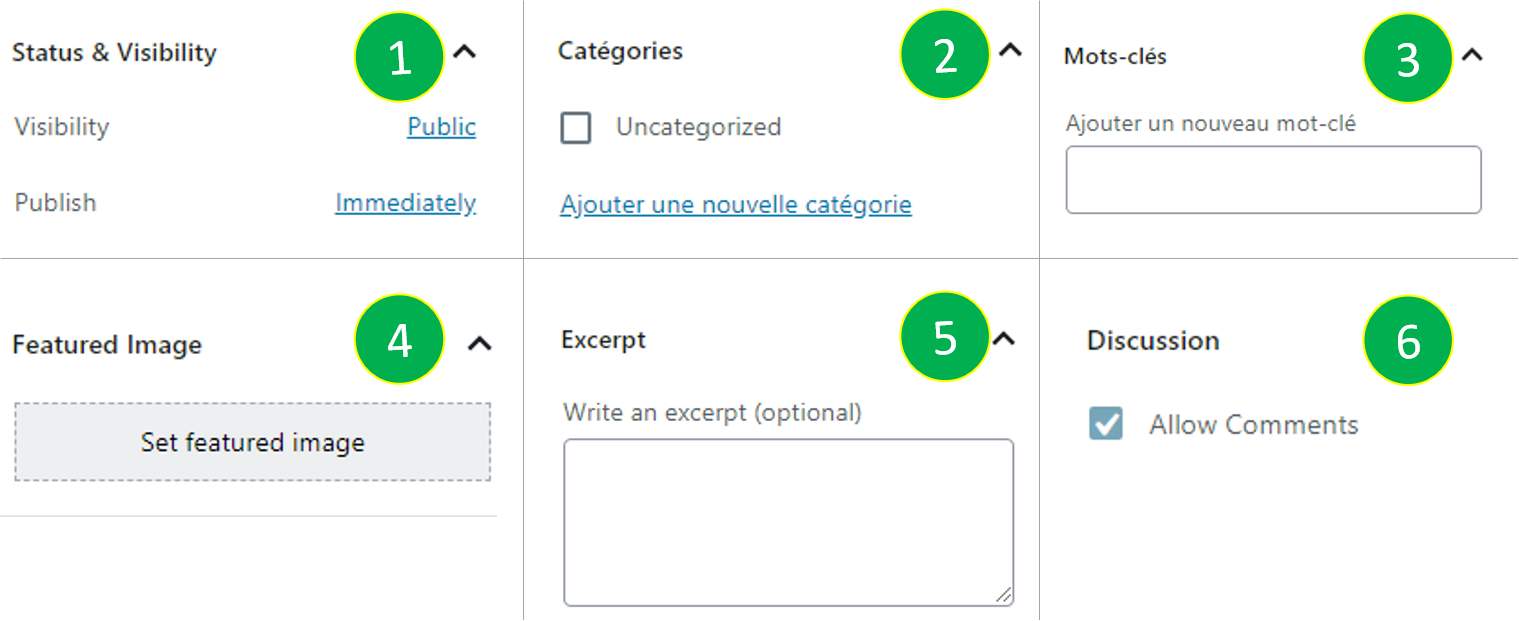
B. VISIBILITY, CATEGORIES, KEYWORDS & FEATURED IMAGE
Click on “Document” on the right of your post:
- Status and visibility:
-
- Make the post visible, private or password protected.
- Publish the post immediately, or schedule its publishing.
- Categories: Click on “Add a new category” to choose the category
- Keywords : Choose the keywords for your post
- Featured Image : There is a special image called “Featured Image”. The latter illustrates the point of your post. Click on “Set featured image” to insert this image.
- Excerpt: The excerpt is a space where you can enter a short description different from your SEO meta description.
- Discussion: You can allow and/or prevent public comments on the post.
* Arranged in order from top row, from left to right:
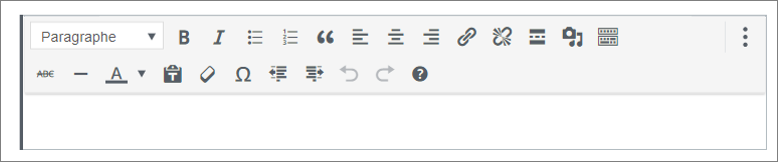
- Paragraph: allows you to choose between paragraph tags, level 1 to 6 headings and preformatted text elements
- B : bold to put in bold
- I : put your text in Italics
- Bulleted list
- Numbered list
- Quote block
- Left-aligned text
- Centered text
- Right-aligned text
- Insert hyperlink (anchor)
- Undo a hyperlink
- Insert media (photo/video)
- Open/close toolbar (shows bottom row)
- ABC: Strikethrough text / cross a text
- —: inserts a horizontal line
- A : allows you to choose the color of the selected text
- T: paste as text
- Eraser to clean formatting
- Ω: to insert special characters (Ø ⊕ ¢ © ® …)
- Decrease text indentation
- Increase the indentation of the text (shifts the beginning of the content to the right)
- Undo (Ctrl + Z) your last operation
- Redo (Ctrl + Y) what you just undid
- ? keyboard shortcuts to increase productivity
CREATING PAGES
A. CREATING A NEW PAGE
- Click on “Pages” and then click on “Add”.
- Enter the title of your new page.
- Click on the « ADD CLASSIC» option to add the standard block (containing several options made available by the WordPress editor *) which will allow you to write the text of your post.
B. VISIBILITY, FEATURED IMAGE & DISCUSSION:
Click on “Document” on the right of your page:
- Status and visibility:
-
- Make the page visible, private or password protected.
- Publish the page immediately, or schedule its publishing
- Featured Image : There is a special image called “Featured Image”. The latter illustrates the point of your page. Click on “Set featured image” to insert this image.
- Discussion: You can allow and/or prevent public comments on the article.

* Arranged in order from top row, from left to right:
- Paragraph: allows you to choose between paragraph tags, level 1 to 6 headings and preformatted text elements
- B : bold to put in bold
- I : put your text in Italics
- Bulleted list
- Numbered list
- Quote block
- Left-aligned text
- Centered text
- Right-aligned text
- Insert hyperlink (anchor)
- Undo a hyperlink
- Insert media (photo/video)
- Open/close toolbar (shows bottom row)
- ABC: Strikethrough text / cross a text
- —: inserts a horizontal line
- A : allows you to choose the color of the selected text
- T: paste as text
- Eraser to clean formatting
- Ω: to insert special characters (Ø ⊕ ¢ © ® …)
- Decrease text indentation
- Increase the indentation of the text (shifts the beginning of the content to the right)
- Undo (Ctrl + Z) your last operation
- Redo (Ctrl + Y) what you just undid
- ? keyboard shortcuts to increase productivity
CREATE A CONTACT FORM
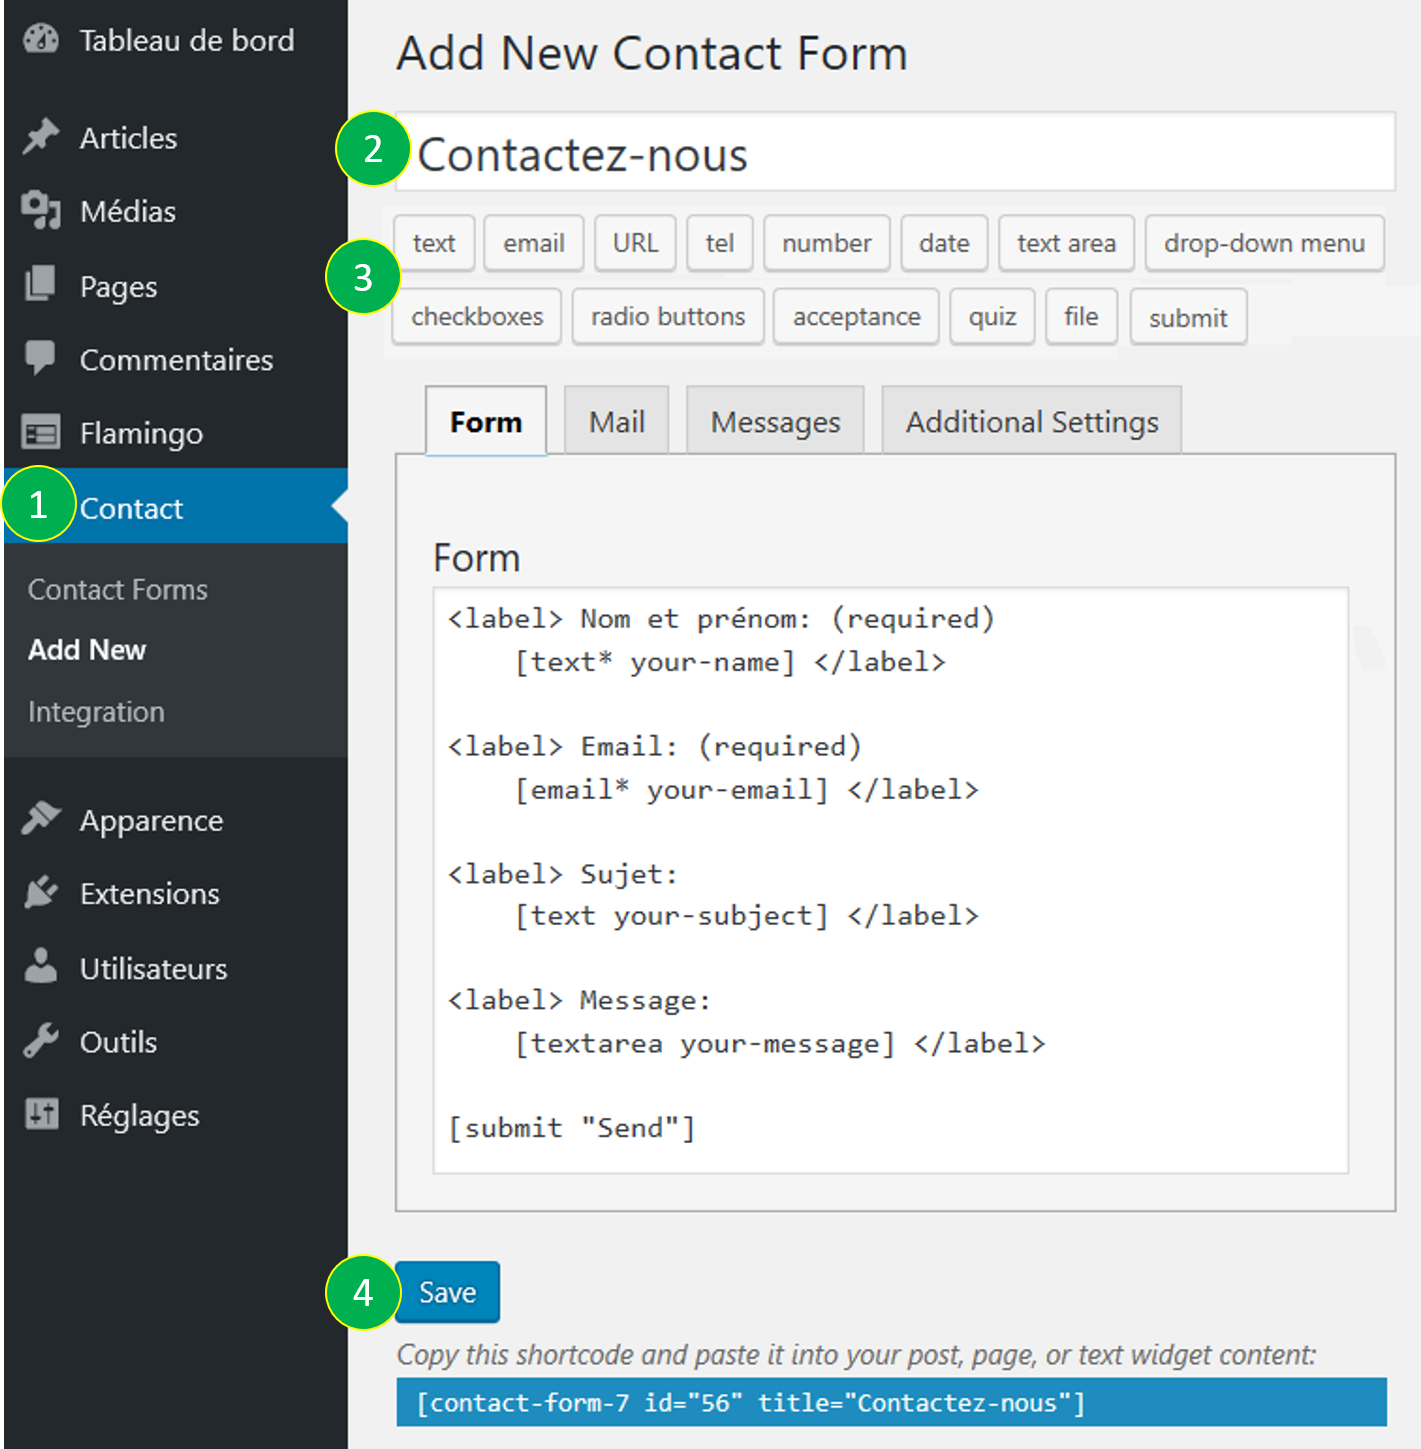
- Click on “Contact” and then click on “Add New”
- Enter the title of the contact form.
- Choose the field(s) you want to add to this contact form. By default, WordPress offers you a sample contact form containing the fields below:
- Surname and First name *
- Email *
- Subject
- Message
- [Send]
- When you click on “Save” a new code will be displayed; you must copy/paste this code in your article or page.
The Etublogs.USJ platform offers USJ teachers, students and institutions the possibility of creating websites thanks to the many online publishing features offered by the WORDPRESS software.
WORDPRESS is the world’s most popular content management system. It is an open-source content management system developed for individuals without any coding experience who want to build websites and blogs. It allows you to quickly create user friendly sites.
If you wish to benefit from our support in this concern, do not hesitate to send us an email at the following address unte@usj.edu.lb or contact us at 01421000 ext. 5923 – 5924.
TO LOG IN
If you have been granted an access to USJ blog; you are required to do the following:
- Open a browser and navigate to https://blogs.usj.edu.lb/wp-admin/ (or alternatively https://etublogs.usj.edu.lb/wp-admin/)
- Enter your username,
- Enter your password,
- Answer the Math Captcha
- Click on “Connection”.
CREATE CATEGORIES/KEYWORDS
A. CREATE NEW CATEGORIES
- Click on « Posts» and then click on « Categories "
- Enter the name of the new category
- Choose the parent category (among old categories) »
- Click on “Add a new category“.
B. CREATE NEW KEYWORDS
- Click on « Posts» and then click on « Keywords "
- Enter the name of the new keyword
- Click on “Add a new Keyword“.
CREATE NEW POSTS
A. CREATING A NEW POST
- Click on “Posts” and then click on “Add”.
- Enter the title of your new post.
- Click on the « ADD CLASSIC» option to add the standard block (containing several options made available by the WordPress editor *) which will allow you to write the text of your post.
B. VISIBILITY, CATEGORIES, KEYWORDS & FEATURED IMAGE
Click on “Document” on the right of your post:
- Status and visibility:
-
- Make the post visible, private or password protected.
- Publish the post immediately, or schedule its publishing.
- Categories: Click on “Add a new category” to choose the category
- Keywords : Choose the keywords for your post
- Featured Image : There is a special image called “Featured Image”. The latter illustrates the point of your post. Click on “Set featured image” to insert this image.
- Excerpt: The excerpt is a space where you can enter a short description different from your SEO meta description.
- Discussion: You can allow and/or prevent public comments on the post.
* Arranged in order from top row, from left to right:
- Paragraph: allows you to choose between paragraph tags, level 1 to 6 headings and preformatted text elements
- B : bold to put in bold
- I : put your text in Italics
- Bulleted list
- Numbered list
- Quote block
- Left-aligned text
- Centered text
- Right-aligned text
- Insert hyperlink (anchor)
- Undo a hyperlink
- Insert media (photo/video)
- Open/close toolbar (shows bottom row)
- ABC: Strikethrough text / cross a text
- —: inserts a horizontal line
- A : allows you to choose the color of the selected text
- T: paste as text
- Eraser to clean formatting
- Ω: to insert special characters (Ø ⊕ ¢ © ® …)
- Decrease text indentation
- Increase the indentation of the text (shifts the beginning of the content to the right)
- Undo (Ctrl + Z) your last operation
- Redo (Ctrl + Y) what you just undid
- ? keyboard shortcuts to increase productivity
CREATING PAGES
A. CREATING A NEW PAGE
- Click on “Pages” and then click on “Add”.
- Enter the title of your new page.
- Click on the « ADD CLASSIC» option to add the standard block (containing several options made available by the WordPress editor *) which will allow you to write the text of your post.
B. VISIBILITY, FEATURED IMAGE & DISCUSSION:
Click on “Document” on the right of your page:
- Status and visibility:
-
- Make the page visible, private or password protected.
- Publish the page immediately, or schedule its publishing
- Featured Image : There is a special image called “Featured Image”. The latter illustrates the point of your page. Click on “Set featured image” to insert this image.
- Discussion: You can allow and/or prevent public comments on the article.
* Arranged in order from top row, from left to right:
- Paragraph: allows you to choose between paragraph tags, level 1 to 6 headings and preformatted text elements
- B : bold to put in bold
- I : put your text in Italics
- Bulleted list
- Numbered list
- Quote block
- Left-aligned text
- Centered text
- Right-aligned text
- Insert hyperlink (anchor)
- Undo a hyperlink
- Insert media (photo/video)
- Open/close toolbar (shows bottom row)
- ABC: Strikethrough text / cross a text
- —: inserts a horizontal line
- A : allows you to choose the color of the selected text
- T: paste as text
- Eraser to clean formatting
- Ω: to insert special characters (Ø ⊕ ¢ © ® …)
- Decrease text indentation
- Increase the indentation of the text (shifts the beginning of the content to the right)
- Undo (Ctrl + Z) your last operation
- Redo (Ctrl + Y) what you just undid
- ? keyboard shortcuts to increase productivity
CREATE A CONTACT FORM
- Click on “Contact” and then click on “Add New”
- Enter the title of the contact form.
- Choose the field(s) you want to add to this contact form. By default, WordPress offers you a sample contact form containing the fields below:
- Surname and First name *
- Email *
- Subject
- Message
- [Send]
- When you click on “Save” a new code will be displayed; you must copy/paste this code in your article or page.
